Helpdesk FAQ
Accounts
For students, accounts become available as soon as the registration process is completed. Please note that registration is considered "completed" when your information is entered into the University of Alaska's Banner Registration system - not when you submit your paperwork. This is true even if your application is submitted online.
For employees, accounts become available as soon as HR enters your information into our Banner database. Please note that there are several steps in this process, and your access may be limited depending on how far into the account creation process you are.
In either case, to activate your new account you will need to find your username and set a password in ELMO (Easy Login Maintenance Option), also referred to as Login Help. While account activation allows immediate access to most UAS resources, it can take up to 24 hours for your class discussion boards to become available.
Your UAS Username is a unique identifier automatically set up for you when you register for UAS courses. The username will be used with UASOnline, Email, campus computers, and more.
To find your username, please visit the ELMO (Easy Login Maintenance Option).
To set your initial password, as well as reset a forgotten password, please visit ELMO (Easy Login Maintenance Option).
A student account will expire if you stop taking classes for a semester or more.
- If you sign up for new classes your account will be reactivated when the registration process is completed. Please note that registration is considered "completed" when your information is entered into the University of Alaska's Banner Registration system - not when you submit your paperwork. However, if you register online as a previous student, account reactivation is immediate.
- If you believe your account should be active and ELMO shows it to be inactive, please contact the Helpdesk for assistance.
- If you are not currently enrolled but completing coursework from a previous semester, please contact your academic department to arrange an account extension.
Did you know it is possible to view course sites and syllabi before you register? Simply visit UASOnline and search for classes in the Course Homesites box.
Student accounts remain active until 8 weeks after the last day of classes for which you are currently registered. This gives you time to move needed materials, notify contacts of an address change, et cetera. When you sign up for new classes your account will be reactivated when the registration process is completed. Please note that registration is considered "completed" when your information is entered into UAS internal systems, not when you submit your paperwork. However, if you register online as a previous student, account reactivation will be immediate.
If you register for the next semester ahead of the start of classes, your account will remain active throughout your time at UAS.
To extend an expired account, refer to the options listed on the Account Extensions page.
For employees, account status is tied to employment paperwork with HR, and expires 7 days after the last date of employment. If you believe your account has expired prematurely, please work with your supervisor and HR.
Welcome to UAS! You should talk with your supervisor to be familiar with your access. For reference, you can use the New Employee IT Checklist. It goes over resources such as accounts, computers, fileshares, and printers.
After changing over to a new phone, you'll still need to update a few things before Duo will recognize the new device. The app may have transferred over but is no longer synced up with your profile.
Full instructions with pictures
To re-enable Duo access through the Duo Mobile app:
- Go to any UA login page that uses Duo and log in to see the Duo menu
- Select My Settings & Devices
- Choose Call Me and press pound (#) after answering the phone call. The push feature will not work until your Duo profile has been updated
- Select Device Options next to the device you need to update (usually this is your cell or mobile device)
- Select Reactivate Duo Mobile
- Select what type of device you are using
- You will see a QR code. Open your Duo Mobile app by selecting I have Duo Mobile installed
- Scan the QR code within the app by tapping the + button
This should update your Duo profile to enable Push notifications to your new phone.
When your UA Username does not match your current name, you can update the username at UA Online in the Personal Information section. Select the UA ID Number and Username. If you do not see the option to update your username, then we may have the wrong name or out-of-date information on file. To update our documentation, please fill out a name change form and submit the completed form and attachments to the appropriate office. Student-related information should be submitted to your local Registrar's Office. Employee-related information should be submitted to your regional Human Resources Department.
Students and Faculty: if you change your username during a current semester, your current coursework may be lost. We recommend waiting until you are between semesters when possible. It may take up to two days for all systems to recognize your new UA Username.

Computer Backup
If you aren't sure if the contents of your computer's sync folders match the contents on the server, you can manually trigger a synchronization:
- Connect to the UAS Authenticated network, preferably by campus ethernet (UAS wifi, or VPN when off-campus)
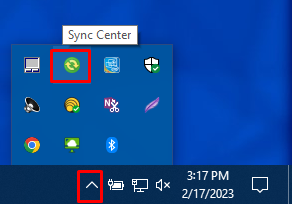
- From the lower right corner, select the Sync Center icon
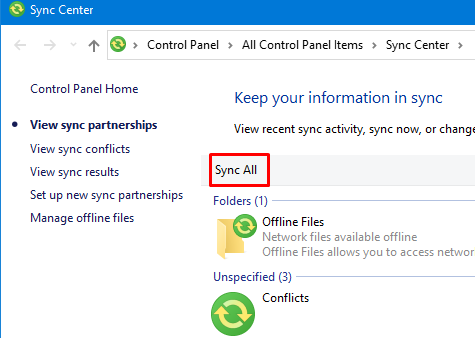
- Note: if there are any Conflicts, they'll be stated on the starting page
- If there are no issues, click the Sync All button
- Allow time for processing. Based on how much data you have, this may take a while
Here is a pdf version of the instructions.
If you ever need to know where your backup folder is for any reason, such as mapping to your files from a different computer, you can look up the file location on the server:
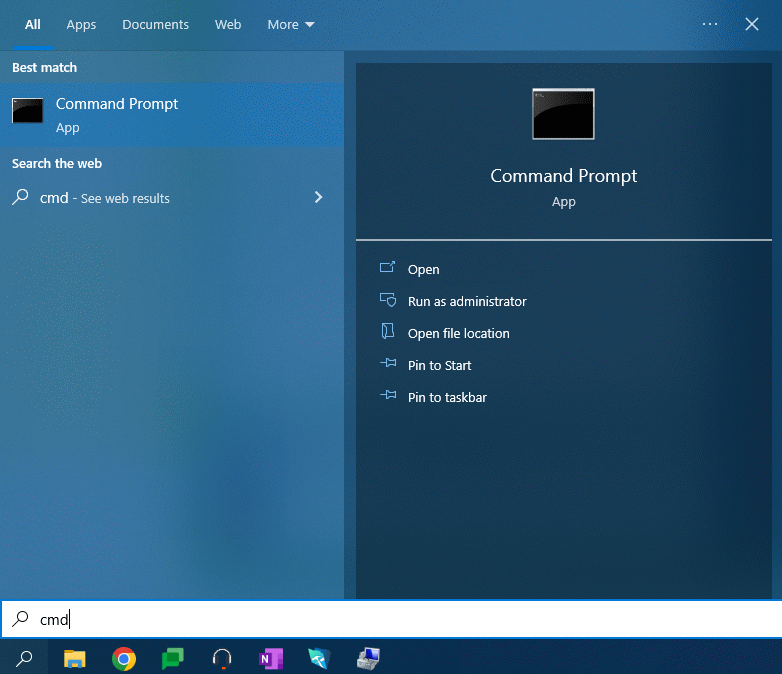
- Open the command prompt by typing “cmd” in the Windows search bar
- Type in “net use” to the command prompt and hit Enter
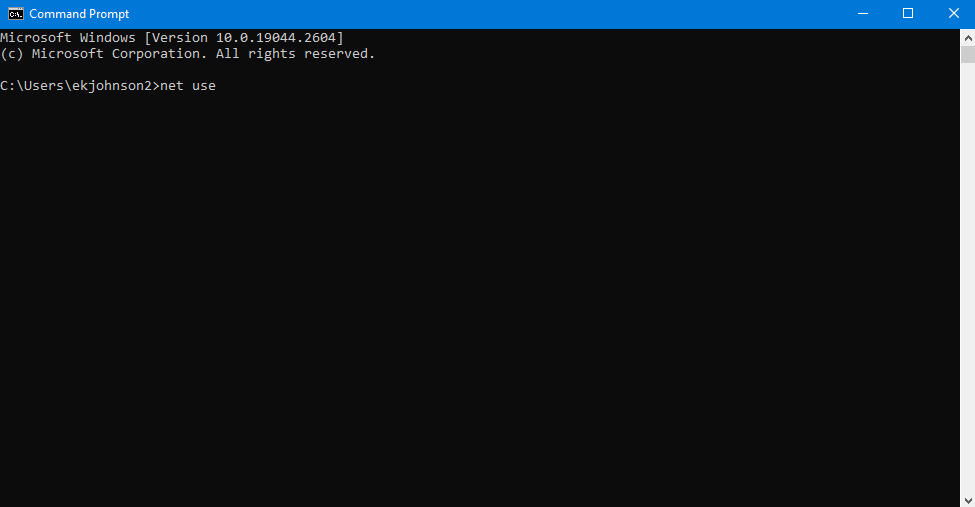
- The full address for each drive will be listed in the Remote column, including all sync folders, departmental fileshares, and other mapped drives

Encryption disguises data, rearranging the bits so that nobody can read or see the information without the secret key, which consists of a uniquely generated password or a digital file.
Synchronization uses features built into Microsoft Windows to make sure your files are backed up onto the UAS file server. It also ensures that files are encrypted so that others cannot access them without authorization. Both of these features are especially important for laptop computers which are easily lost or stolen.
The synchronization process makes sure the files on your computer and the files on the server are the same.
Only files stored on your Desktop and My Documents folder are synchronized. Any other files, including files on your local hard drive, are not synchronized or backed up.
Further, Microsoft Access Database (*.mdb) files are unable to sync. If you have these files within your Sync folder, you will receive an error message indicating that the Access file(s) cannot be synchronized.
Synchronization works best if you have less than 2 gigabytes of data. The synchronization process is not intended for extremely large amounts of data. If you have over 4 gigabytes of data, you should store your files outside of the "My Documents" folder and consult with IT services on an alternate backup strategy.
You can access your synchronized files just like a fileshare. In the Folder/Address field, type the location of your sync files, then click Connect.
If you don't know where your sync files are located, check out the "Where are my files backed up to?" question above.
The computer should synchronize when you log on, log off, or while it is idle (you're away from the keyboard). The process will attempt to run when you're away from the UAS network; however, in that instance, it will fail. If you're away from campus and it fails, this is expected since the file server is not available.
Windows File Synchronization should only take a few seconds. This happens in batches; instead of scanning file-by-file, it will scan multiple files all at once. Depending on the file structure (large files such as videos or many smaller documents), it could take longer. You should not cancel the process unless necessary. If canceled, items within My Document may show different versions than the last saved iteration, or be missing altogether. The first step in resolving sync issues will be to perform a full synchronization - for this reason, we strongly recommend against canceling the synchronization.
Network backup requires computers to be constantly turned on and consuming electricity. It also requires laptops to be left connected to the campus networks. Finally, hard drives have become so large that it is no longer possible to back up all campus computers even over an entire weekend.
DocuSign
Envelopes are great for sending out unique documents that need to be signed once or twice at most.
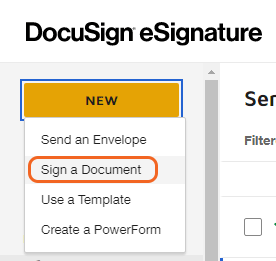
- Log in to DocuSign
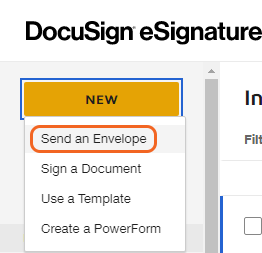
- Start an envelope by clicking on the "New" drop-down menu on the Home or Manage page
- Select the "Send an Envelope" option
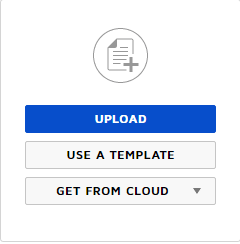
- Press the "Upload" button and select the document you wish to send
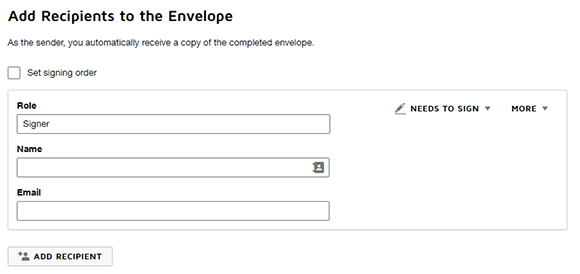
- Add the Name and Email of the recipients you wish to sign your document. Note that you can set a signing order if necessary by clicking the check box above the recipient list
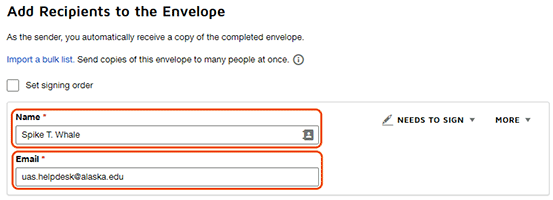
- Click Next
- If you've uploaded a fillable PDF you can choose to Assign it to a signer to automatically convert the content
- Add the fields you'd like to be filled out or signed. Fields can be customized using the menu on the right
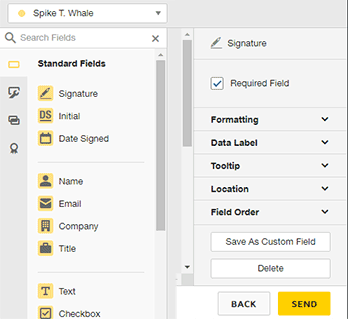
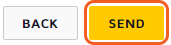
- When complete, click Send
Templates are great for documents that will need to be sent out multiple times, such as registration forms or request forms.
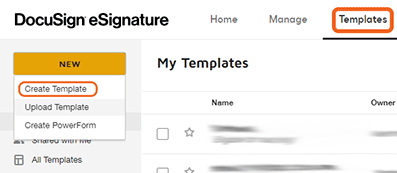
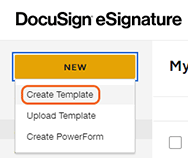
To create a Template:
- Log in to DocuSign
- From the Templates page click on "New" and select the "Create Template" option
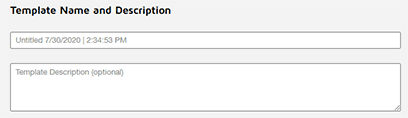
- Enter a name and description for your template
- Add the file you wish to have signed with the "Upload" button
- Add at least one role to your recipient list: you can customize this to a generic recipient (to set when the template is used) or a specific recipient (such as a department that's always a part of the process)
- Press Next to set signing fields

- Add the fields you'd like to be filled out or signed. Fields can be customized using the menu on the right (fields explained)
- To finish your template press Save and Close

PowerForms are forms that can be accessed and signed through a secure URL that can be linked to websites and emails. This is great for documents used often by a lot of people. Only accounts with the correct permissions can create PowerForms. If you need to create PowerForms contact your administrator.
To create a PowerForm:
- Log in to DocuSign
- Navigate to the Templates page
- Select the Template you have already created and wish to use
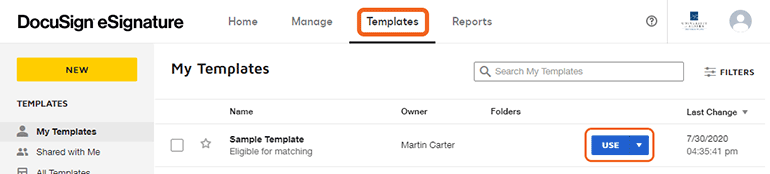
- Click the "Use" button to the right of the Template and select "Create PowerForm"
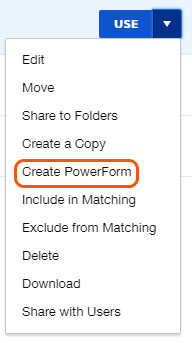
- Fill out the PowerForm Summary with the Name, Email Subject, and Instructions for the signer on how to complete your form
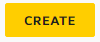
- Click "Create" to finish and create your PowerForm
- Locate (or create) a fillable PDF, with fields to be filled out by the signer
- Log in to DocuSign
- Access the Template tab

- Create and name a NEW Template
- Upload your fillable PDF
- You will see a notice that form fields have been found.

- You will see a notice that form fields have been found.
- Add at least one Recipient Role
- Click the Next button in the upper or lower right
- In the Manage PDF form field data, select Assign to: and select your initial Role from the dropdown list, then click Confirm
- After processing, you should see all the PDF fillable fields in Docusign format
- Adjust fields as necessary for Required, Added Text, Formatting, etc
- Click Recipient Preview in the upper right to view the current template
- Click Recipient Preview in the upper right to view the current template
- Click Save and Close to lock in the settings
Your fillable Docusign Template can now be sent to your intended recipients, or be used to generate a PowerForm.
- Click Review Document in the email sent to you
- Click Continue
- If this is your first time filling out a form, you must accept the terms and conditions

- If this is your first time filling out a form, you must accept the terms and conditions
- Review the document. Click on the Start button to walk through each field that needs completing. Required fields are highlighted in red, while optional fields are highlighted in gray. Click on each field to accept or customize it
- Click Finish

A notification email will be sent when the document is completed.
- Follow the link to the online form
- Enter your full name and email address. Make sure to follow the instructions provided
- Click Continue
- If this is your first time filling out a form, you must accept the terms and conditions.
- If this is your first time filling out a form, you must accept the terms and conditions.
- Review the document. Click on the Start button to walk through each field that needs completing. Required fields are highlighted in red, while Optional fields are highlighted in gray. Click on each field to accept or customize it
- When you've entered all the necessary information, click the Finish button
Make sure you have claimed a UA DocuSign account. To claim your UA DocuSign account, go to OIT's DocuSign page and choose the Request a DocuSign Account button.
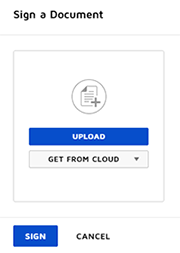
- Log in to DocuSign
Click New and select Send an Envelope
- Choose Upload or Get from Cloud depending on where your document is saved. Select the form to sign, and click the Sign button
- Click Continue
- If this is your first time filling out a form, you must accept the terms and conditions
- If this is your first time filling out a form, you must accept the terms and conditions
- Add the fields you'd like to fill out or sign. Fields can be customized using the menu on the right
- Click Finish from the top menu
- Add the recipient(s) you'd like to receive the signed form. You must include a Full name and Email Address. Click +ADD RECIPIENT to send to additional addresses. You can also choose to customize the email Subject and Message fields
- Click Send and Close

General Information
Every account created at UAS is given a UA Google email address: username@alaska.edu. This is your official email address for university activity.
You have several options:
- UA Google webmail can be accessed from the Personal Menu (head and shoulder icon) as my Email at the top of UAS webpages. You can also access it directly by going to UA Google(google.alaska.edu).
- Configure Outlook to connect to UA Google. See UA Google Access for more information.
- Set up an alternate Email Client. See the OIT Supported Clients page for more information.
Simply update your Email Destination in ELMO:
- Sign in to ELMO
- Click the change link next to Email Destination
- If you have not confirmed this in some time, it will ask you to confirm automatically
- Enter your preferred mail address
- Click Save Settings
- UA Google is the standard email
- Other will redirect to any other account you enter (personal email address).
From this point forward, all mail you receive at any university address will redirect to your preferred address. All incoming emails will still be copied to your UA Google inbox. We recommend testing the forward function by sending your UAS account a test message. (Keep in mind that a typo in this process could result in either bounced or misdirected/lost email messages.)
Please note that UA employees are required to use their UA Google email address to conduct university business, and will be unable to set this forwarding.
Run the Google Workspace Sync for Microsoft Outlook tool
- Go to the Start menu
- Open the Google Workspace Sync folder
- If you do not see this folder, you can download the tool at Google Workspace Sync
- Select Set up a Google Workspace Sync user
- Sign in with your username@alaska.edu address and click Continue
- Click Allow when prompted in your browser
- Click Create Profile.
When completed, you will be prompted to select a profile when Outlook opens. By default, this is named "username@alaska.edu - Google Workspace." A Synchronize Status window will appear, displaying the status of Outlook connecting with the Google server. This may take some time, depending on the amount of email present.
Yes. Mac Mail (or Stamp Mail) is the recommended client for accessing your Google mailbox on a Mac.
- Open up Mac Mail
- On the toolbar, click on Mail and then Preferences
- Go to the Accounts tab across the top of the window
- Click the + button on the bottom left of the widow
- Select the Google Mail provider and click continue
- Sign in with your username@alaska.edu address
- Sign in with your UA credentials
Access to department email accounts is typically managed through the Group Security Manager tool. Ask your department's admin assistant about who manages that email account.
Webmail
Once you've logged in to Google Webmail, you can access any delegated accounts you have access to by clicking your profile button in the upper right (by default, an image of your first initial). This will populate a list of all of the delegated accounts you have access to. If you do not see one on the list, please contact the email account manager and confirm both that you have access, and that the account has been migrated.
(Video Instructions)
Outlook (PC)
After configuring Google Workspace Sync for Microsoft Outlook in Outlook, you can add additional delegated accounts through GWSMO.
- Exit Outlook
- Start > All Programs > Google Workspace Sync > Add account for delegation
- Select the Outlook Google profile
- Enter the account to which you have delegated access (typically UAS_account@alaska.edu)
- Click OK
The delegate account will now be added to your Outlook Profile.
Vacation messages can be added and removed from the webmail interface. Simply follow these steps:
- Log into UA Google
- Click on the Gear icon in the upper right
- Select Settings from the drop menu
- Locate the Vacation responder along the side
- Set the First day (and optionally the Last day)
- Edit your vacation message
- Click the button to turn the Vacation responder ON
- Click Save Changes
To remove Auto-reply or Vacation message, simply click the button to turn Vacation responder OFF.
Email passwords are the same as any other UAS password. To change your UAS password, go to Login Help (ELMO) and reset the password for all your UAS computer accounts.
Any change made by either Google or Outlook will need to synchronize before it shows up on the other side. If Google Workplace Sync is in the middle of a large batch of synchronizations, this may take some time. We recommend making all of your settings changes in Google, as not all changes in Outlook will spread to Google. If Outlook is taking too long to sync, close the program and reopen it.
Contacts in Google are accessible through the webmail interface. (Outlook users should use LDAP.)
- Log in to UA Google
- Click the 9-dots menu in the far upper right
- Select Contacts
This page lists all of the contacts created by your account, as well as a link to the full UA Directory.
To have your email automatically know the recipients' address by only typing their name, you'll need to be connected to the LDAP server. Here are the steps to connect to the UAS and UA Statewide LDAP services in Outlook. (Google webmail users should use Google Contacts.)
- Open your Outlook Google profile.
- Select the File menu at the top of your window.
- Under Account Information, click Account Settings, then select Account Settings... from the option choices
- In the Account Settings window, select the Address Book tab, then click New...
- Choose Internet Directory Service (LDAP), then click Next at the bottom of the window.
- For Server Name, enter ldap.uas.alaska.edu
- Click both check boxes, and enter your UA credentials
- Click Next at the bottom of the window.
- Restart Outlook when prompted.
These "bounced back" email errors occur when messages can not be delivered to an email account. This message will usually explain why the message was undeliverable and who the recipients were. If this is not clear, please forward the message as an attachment to the Helpdesk (uas.helpdesk@alaska.edu). We will be happy to help resolve the problem.
To forward a single message as an attachment, go to UA Google, check the email in your inbox, click the 3 dots menu at the top, and select Forward as an attachment. You can then send it as a normal email.
Students will want to use the syntax of username@alaska.edu as the address to give out.
Employees will be given a username@alaska.edu address that will be received at their primary Email Destination and in their UA Google inbox. Personalized email aliases (such as first.last@alaska.edu) can also be created in ELMO: log into ELMO's alias page. From here, review your alias options, and click the Activate button for any you would like to use. If there are additional addresses you would like to use, please contact the Helpdesk. Please note: once activated, these aliases will be permanently assigned to your UA email account.
Users with existing username@uas.alaska.edu accounts will still receive emails sent to these addresses. Employees with existing first.last@uas.alaska.edu vanity addresses will also receive mail sent to this address. Initially, these addresses are configured as their names are stored in the university information system (Banner), but can be altered to fit preferred names (Tom vs Thomas, etc). Please contact the Helpdesk for information about configuring this setting.
Google Webmail
- Click the Gear icon in the upper right
- Select See all settings from the drop menu
- On the General tab, locate Signature from the list of options
- Click the button beside the text field
- Enter the text of your signature
- You can also set Signature defaults immediately below, specifying different signatures per email address and whether the email is New or a Reply/Forward
- Click Save Changes at the bottom of the page
Outlook
- From a new email, select the Insert tab
- Click the Signature button, and select Signatures from the menu
- Click New to make a new entry
- Enter a name and click OK
- Enter the text of your signature in the Edit signature box
- Click OK
Google Webmail
- Compose a new email
- From the bottom menu, click the Insert signature button
- Select your preferred signature from the list
Outlook
- Create a New Email
- Select the Insert tab
- Click the Signature button and select your choice of created signatures from the dropdown menu
- Your chosen signature will be added to the end of the email. this will replace any other signatures chosen
Google Mail recognizes that the incoming message is identical to the copy in your "Sent Items" and ignores the duplicate. This is a part of Google's threading feature in the web client when you post a reply, your reply is threaded in with others' responses. This is a system feature and can not be disabled.
Sent emails can always be viewed in the Sent Items label.
UA Google doesn't actively update from the directory. It needs to be updated directly, and this will occur when a Username Regeneration request is placed in UA Online. Please note that doing this mid-semester can interfere with active courses.
Google has unlimited space. However, messages are limited to 25 Mbs each. If you need to send larger attachments, you can use Google Drive. If Google detects an attachment that's too large, it will automatically use Drive.
You can grant other people access to your Google email inbox. Please be aware that this grants them full control over your account.
From UA Google:
- Click the Gear icon in the upper right.
- Click See all settings.
- Select the Accounts and Import tab.
- In the Grant access to your account, click Add another account.
- Enter the other individual's @alaska.edu account.
- Click Next Step >>
- Click Send email to grant access.
- An email confirmation will be sent to their account.
- Upon the other individual clicking the confirm link, there is up to a 30-minute processing time. it will then be available from the upper right, similar to other delegate email accounts.
You can share your Google calendar with others and designate the level of access from view only to full access.
From UA Google:
- Click the Google Apps icon in the upper right
- Click Calendar
- Click the Gear icon in the upper right
- Click Settings
- Select the Calendars tab
- Click Shared: Edit settings for the calendar
- Under Share with specific people, enter the person's email address (e.g. username@alaska.edu)
- Select the appropriate level of Permission Setting
- Click Add Person
- Repeat steps until all people are entered
- Please also review the "Share this calendar with others" setting
- Click "Save"
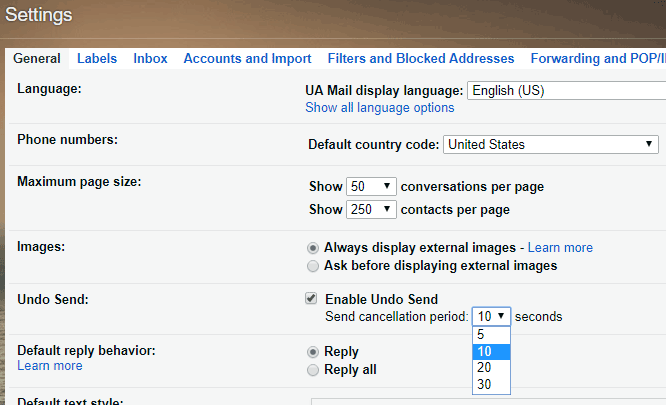
Google has a tool that allows you to delay outgoing messages. This means that after you hit Send, you've got a frame of time to cancel the message and make changes.
From your Google Settings, under the General tab, check the Enable Undo Send box. You can customize how long Google saves your message: 5, 10, 20, or 30 seconds.
Google's Conversation View is designed to keep all emails on the same subject together. It does this by filtering up to 100 emails with the same or similar Subject lines into one Conversation. This can cause difficulty if you have similar conversations at the same time.
To turn on or off Conversation View:
- Log in to UA Google
- Click the Gear icon in the upper right
- Select Settings
- From the General tab, scroll down to Conversation View
- Select the button to turn the Conversation View On or Off
- Scroll to the bottom of the screen and click Save
Spam
Spam refers to unsolicited emails with the intent of gathering information from the recipient. It may come in the form of advertisements, personal requests, solicitations, offers, prizes, or a myriad of other options.
What you can do to avoid being caught by spam:
- If you don't know if an email is sincere, ask. Your coworkers and the Helpdesk may be able to guide you.
- Always check the sender and recipient information on suspicious emails. Spam may have strange or false email addresses listed.
- Don't provide confidential information through email, if it can be avoided.
- Never reply to a fraudulent email. This gives the spammer information about you.
- Never click "unsubscribe" unless the message is from a trusted source. This gives the spammer information about you.
To release a legitimate message marked as spam, drag the message from the Junk/Spam folder to your Inbox. You can add the sender's email address to your list of "Safe senders."
In webmail, select the spam message(s) and click the Not Spam button.
Mail in your Junk folder will be automatically deleted after 30 days.
Fileshare
You can connect to a department fileshare on any campus computer by Mapping a Network Drive
(PC video instructions)
If you are off-campus, connecting to the VPN first is required.
Windows 10
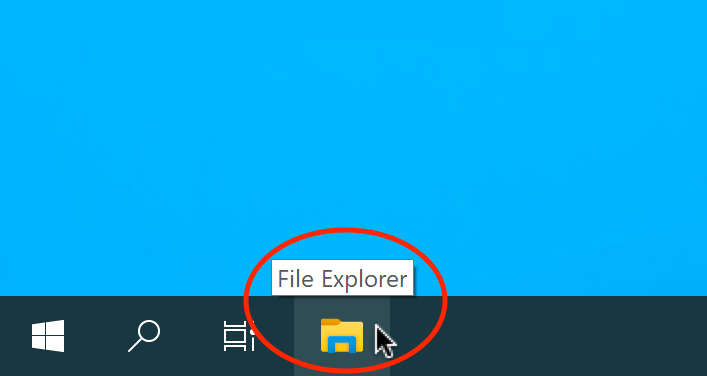
- Open a new File Explorer window by pressing the Windows key + E, or clicking the File Explorer icon in the taskbar:
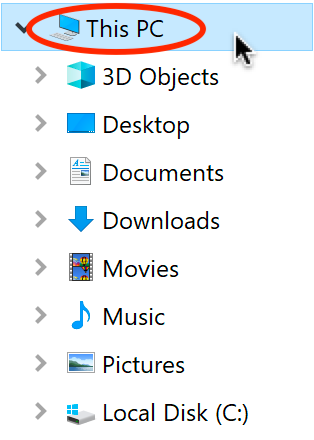
- In the sidebar, click This PC
- From the top menu, select Map Network drive
- If you don't see the full menu, click Computer
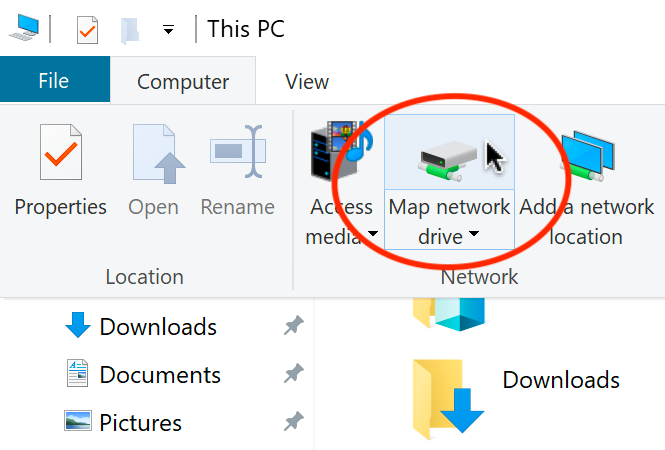
- If you don't see the full menu, click Computer
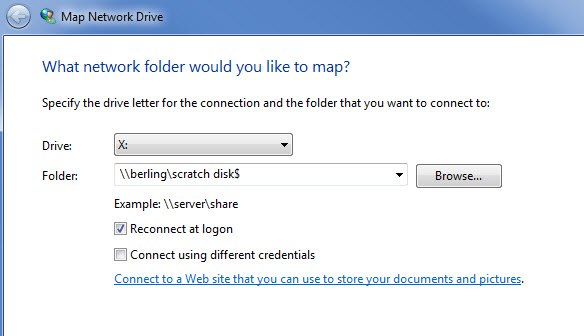
- Fill in the Folder: field, by typing the server name (ex. \\jun-campusfs01.ua.ad.alaska.edu) and the fileshare name (ex. \scratch disk$) combined, and you'll see: \\jun-campusfs01.ua.ad.alaska.edu\scratch disk$
- Check the box to Reconnect at logon, and click Finish
To connect to your campus department fileshare:
In the Folder field, type in \\jun-campusfs01.ua.ad.alaska.edu\fileshare_name$, then click Finish.
Note: replace "fileshare_name" with your departmental fileshare (its, admissions, etc)
To connect to your UASHome directory (aka Z: drive):
In the Folder field, type in \\uashome.alaska.edu\users$\username, then click Finish.
Note: replace "username" with your campus username (ex: cjbennett)
To connect to your synced files on your computer:
In the Folder field, type \\sync-al.ua.ad.alaska.edu\files$\username, then click Finish.
- For older computers, the address is \\sync-al.ua.ad.alaska.edu\files$\computername\uausername)
Note: replace "computer name" and "username" with your specific information
If you need assistance determining the correct file path, please contact the Helpdesk for additional assistance.
This describes how to map a campus fileshare on your Apple OS X machine while on campus. Mapping your account allows you to access any files that you have stored on the network.
(Mac video instructions)
If you are off-campus, connecting to the VPN first is required.
MacOS
In the Finder, click on the Go menu, and select Connect to Server.
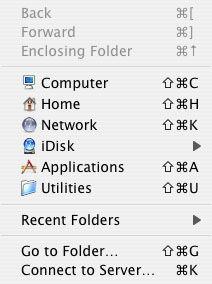
To connect to your department fileshare:
In the Address field, type in smb://jun-campusfs01.ua.ad.alaska.edu/fileshare_name$, then click Connect
Note: replace "fileshare_name" with your departmental fileshare (its, admissions, etc)
To connect to your UASHome directory (aka Z: drive):
In the Address field, type in smb://uashome.alaska.edu/users$/username, then click Connect
Note: replace "username" with your campus username (ex: cjbennett)
To connect to your synched files on your computer:
In the Address field, type in smb://sync-al.ua.ad.alaska.edu/files$/username, then click Connect
- For older computers, the address is smb://sync-al.ua.ad.alaska.edu/files$/username)
Note: replace "computer name" and "username" with your specific information
If you need assistance determining the correct file path, please contact the Helpdesk for additional assistance
Absolutely.
Simply contact the helpdesk with a request to specify permissions to the particular folder in question. We'll need to know which fileshare & folder (ex: \\jun-campusfs01.ua.ad.alaska.edu\its$\Helpdesk\Professional Staff\) and what access (read/write/both) should be granted to that directory.
Google Apps
Access
Google applications can be accessed in several ways.
- On the main UAS website, log into the menu at the top of this page and either select My Email from the personal menu or click the pop-up menu (
 ).
). - Go straight to your UA Google inbox at google.alaska.edu.
Once you have accessed your email inbox or any other Google app, you can connect to other apps by clicking the app menu in the upper right:
UA Google accounts have to be considered active at all times, to better manage workplace accountability.
Calendar
You can see the calendars you have access to through Google Calendars. On the left navigation bar, you can see My calendars as well as Other calendars that have been shared with you. You can use the search field in Other Calendars to add additional UA Google calendars, such as calendars for coworkers and Resource Calendars. You can search these calendars either by name or email address. By default, you will be able to tell when a calendar is free or busy, without any details about specific events. If you are using Outlook, it will match your currently available calendars the next time it synchronizes.
Personal calendars can be adjusted by their owner. From Google Calendars:
- In the left navigation bar, locate the Calendar you wish to share access to.
- Click the Options menu (3 dots) to the right of the calendar.
- Select Settings and Sharing.
- Under Share with specific people, click Add People and Groups.
- Search for and select the UA accounts you wish to grant access to.
- Select the Permission Settings you want to grant.
- Click Send.
Resource Calendar access is managed through the Group Security Manager tool. Once access has been granted, the calendar can be viewed at the PUB address provided when the calendar was created (ex: uas.alaska.edu/pub/excalendar). If you don't know the PUB address for the calendar, reach out to the person who granted you access, or have them reach out to the Helpdesk for assistance.
Calendars can also be set to Public so that people within the UA system can access free/busy content by default.
When you edit an event in Google Calendar, an option to Add guests appears on the right. Enter the name or email address of the people you wish to invite and click Save. You will be asked if you'd like to send invitations to guests. They will receive an email to confirm their attendance. They can choose Yes, Maybe, or No, and will automatically be added to their Google Calendar based on their answer. You can confirm their status by looking at the event in your calendar.
If you'd like to have someone else decide when to set up an event, see the Appointment Slots below.
When editing a specific event, you can select from Google's color options in the Event color field, with the first color being the default for that calendar. You can customize each calendar in the Calendar Settings drop-down menu with a wider variety of color options.
Yes, Google and Outlook both allow viewing and editing of several calendars simultaneously. Click the box next to each calendar on the left My Calendars menu to toggle on/off each calendar.
Google Calendar provides the option to open up your calendar for other people to schedule events. Called Appointment Schedule, this enables you to set specific time frames in which others can book a time. For instance, you can set it so that others can claim an hour of your time, available every Tuesday afternoon. To set up Appointment Schedules:
Note, if you do not see the Appointment schedule, make sure it's enabled on your account. See the next FAQ item: How do I turn on Appointment Schedules?
- Access Google Calendars (calendar.google.com)
- Log in with your UA Google credentials
- Click the starting time to create an Event
- Alternatively, you can click and drag to set the entire duration of the event
- At the top of this event window, click Appointment schedule
- Provide a Title (this will apply to all slots)
- In the time & date field (clock icon), set the duration you'll be available (ex: 1:00 PM – 5:00 PM)
- Click the Set up the Schedule button
- In Appointment duration, set how long each appointment will be
- Some additional optional, but useful settings:
- General availability: settings for daily options and weekly re-occurrence
- Scheduling window: limit when someone can book an appointment
- Adjusted Availability: adjustments for specific dates, for when you have something such as conflicting meetings
- Booked appointment settings: prevent back-to-back and excess bookings
- Calendars checked for availability: prevent bookings for busy times on one or more calendars
- When complete, click Next
- Appointment schedules use your UA Google name and profile pic.
Some additional settings:- Location and conferencing: where will you meet, physically or virtual
- Description: This is a great place for full notes about meeting with you
- Booking form: Request the booker provide more information than the default First name, Last name, and email address
- Booking confirmations and reminders: configure notifications and reminders
- Click the Save button
- When you’re returned to Google Calendar, click on the group of Appointment schedule
- Click the link to Open the booking page
- You can also use the Share to enable them to book appointments
Others can book appointments by accessing that link, clicking the slot they’d like, adding additional notes, and clicking Save.
As Google phases in, individual Workspace accounts are gaining access to Appointment Schedules. This will eventually replace Appointment Slots. To enable this feature:
- Access google.alaska.edu
- If prompted, log in with your UA credentials
- Access Settings (gear icon, upper right)
- From the General tab, scroll down to Appointment schedules
- Select the box “Create appointment schedules instead of appointment slots.”
This change is auto-saved, so will show up next time you reload your Google Calendar.
You can access your Google Calendars in Outlook through Google's Google Workspace Sync for Microsoft Office (formerly GASMO or GSSMO). This program automatically synchronizes Outlook with your Google account, including Email, Contacts, and Calendar. For more information, see the UA Google Access section of the Email page.
You can access your Calendars through your Google account, though specifics vary by device. Webmail access is available in your browser, or you can connect via various apps. Specific instructions for various devices can be found on the Email Mobile Setup page.
On the left navigation bar, locate and select the calendar you wish to remove. If you don't want to see it now but intend to use it later, click the box on the left to remove it from the calendars present. If you want to remove it entirely, click the arrow for the drop-down menu, and select Hide this calendar from the list.
Google allows you to edit either a single event or all the repeated entries. In Google Calendars, you can edit Only this instance, All following events, or All events in the series. In Outlook, you can edit the Occurrence or the entire Series, respectively.
Yes, you can connect to the same list of calendars on any supported device.
iPhone:
- Go to Settings > Accounts and Passwords > Add Account > Google
- Under Enter your email, use your username@alaska.edu, click Next
- Enter your UA Username and Password
- Click Save
- Select Turn Calendar sync on
- Go to the Google Calendar for iPhone page to pick which calendars you want to sync with your UA Account (you will be prompted to log in), then click save.
- Calendars won't appear right away, but will gradually appear within a couple of minutes as background processes complete.
Android:
- Access the App Drawer
- The next step varies based on your version of Android:
- In Android 4.1, tap Add Account under the Accounts category
- In Android 2.3 and 4.0, tap on Accounts & sync
- Click Corporate
- Enter your email address and password
- The dialogue may expand asking for similar settings. Confirm your username and password are correct---Select which services to sync, then tap done
- Access the Calendar App
- Tap on the menu icon to bring up a dialogue with the calendar items to display
- Tap the boxes next to the calendars you want to display
- If managing multiple accounts, tap Calendars to sync to bring up a complete list of accounts available
Apple has created a built-in tool within Calendar to subscribe to active calendars:
- Open Calendar
- Select File
- Choose New Calendar Subscription
- Enter the URL of the calendar you would like to add:
- Academic Calendar:
https://calendar.google.com/calendar/ical/alaska.edu_ipci4179agh2au267hgd50psvs%40group.calendar.google.com/public/basic.ics - CELT:
https://calendar.google.com/calendar/ical/alaska.edu_uvv3oi4j7kadu9o9jf087ltl4o%40group.calendar.google.com/public/basic.ics - IT Conference Room (HB102):
<https://calendar.google.com/calendar/ical/alaska.edu_2d37303536313930393034%40resource.calendar.google.com/public/basic.ics
Please note that this method is intended for use in subscribing to published calendars, and is hence read-only.
To create a link to additional Google calendars:
- Open a browser
- Access the calendar in Google Calendars (calendar.google.com)
- You can add Google Calendar by either searching for them in the Search for People field on the left or by clicking the +GoogleCalendar button from the calendar's web page
- Enter the Settings menu by clicking the gear icon in the upper right
- Alternatively, you can click the menu that appears when you mouse over the specific calendar and select Settings
- Select the specific calendar you wish to add
- Scroll down to the Integrated Calendar section
- Select the Public address in iCal format
- Copy this address
- Enter the address into Apple Calendar using the instructions above
You'll need to visit your iPhone's Settings app to subscribe to active calendars:
- Open Settings
- Select Passwords & Accounts
- Select Add Account
- Choose Other
- Select Add Subscribed Calendar
- Enter the URL of the calendar you would like to add:
- Academic Calendar:
https://calendar.google.com/calendar/ical/alaska.edu_ipci4179agh2au267hgd50psvs%40group.calendar.google.com/public/basic.ics - CELT:
https://calendar.google.com/calendar/ical/alaska.edu_uvv3oi4j7kadu9o9jf087ltl4o%40group.calendar.google.com/public/basic.ics - IT Conference Room (HB102):
https://calendar.google.com/calendar/ical/alaska.edu_2d37303536313930393034%40resource.calendar.google.com/public/basic.ics
Please note that this method is intended for use in subscribing to published calendars, and is hence read-only.
Fileshare
Google Drive is a Google-provided tool to store, edit, and collaborate on personal documents online. UAS provides the Google Fileshare tool, which allows departments and group to control access to specific Google Drive locations from a centralized tool: Group Security Manager.
No, there is not a size limit to what you can place on a Google Fileshare.
Creating new folders inside a Google Fileshare is the same as in Google Drive. Click the New button in the upper left, and select Folder. Enter the name of the folder and click Create. This creates a new folder inside the fileshare that shares the same access permissions. An automated process will change the Owner listed on the folder to match the fileshare's setting.
All files stored on Google Drive are saved to Google servers, not UAS servers. This includes Google Fileshares. Be aware of this when choosing where to save your files.
Google is great for sharing and collaborating, but it is not a good storage location for sensitive information. Consider if your document contains personal data or materials that should not be released to the public, in accordance to FERPA regulations. For more information, check out the Google Guidance document.
Everyone granted access to the Google Fileshare can view, copy, and edit documents. If you want to provide special read-only access to particular people not within the group, you can share using standard google sharing techniques.
Google Fileshares are designed with current University groups in mind. Access is tied to University accounts, and not designated for outside use. Instead, you can create and manage your own Google Drive folders which do not require authenticated access.
Management
Access is managed by adding and removing people from a group. This group access is managed by someone within the department through the use of Group Security Manager within UAS Online.
Creating a Resource Calendar or Google Fileshare allows account access to be controlled from a central location. Multiple resources can be managed in the same location, or even the same list of people, and will update according to UA account status.
Fill out and submit the Google Resources Request Form. The IT Helpdesk will contact you about your request.
You can grant other people direct access to your personal calendars. You can grant specific individuals various levels of control, from hiding all details to creating and editing all your events.
Administrator access can be granted to multiple individuals in Group Security Manager. Having several individuals as admin allows you to control the workload and cover availability.
Being granted admin access does not grant access to the content. From UAS Online, go through Group Security Manager and add yourself to the User list.
Accounts are set to automatically expire after a certain amount of time. Every night, an automated process extends all active accounts by a day. As long as the account is still considered active, they will still have account access.
For more information, check the Accounts page.
Network
Most newer laptops have both, and nearly all desktops will have Ethernet. Check the specifications of your particular computer model.
You can update your operating system, maintain up-to-date anti-virus software (software recommendations), and be cautious about programs from emails or the Internet.
| Location | Equipment |
|---|---|
| Freshman Dorm | 20 Cisco AIR-AP2802I |
| Lodge | 2 Cisco AIR-CAP2702I |
| Banfield | 6 Cisco Air-AP2702I, also has wired ports |
| A Building | 3 Cisco AIR-CAP2702I |
| B Building | 3 Cisco AIR-CAP2702I |
| C Building | 3 Cisco Air-AP2702I |
| D Building | 5 Cisco AIR-CAP2702I |
| E Building | 4 Cisco AIR-CAP2702I |
| F Building | 7 Cisco AIR-CAP2702I |
| G Building | 3 Cisco AIR-CAP2702I |
VPN
The very first time users log into GlobalProtect, they will need to click the Sign In (or Submit) button, instead of pressing Enter on the keyboard.
There are several places you can check to try to track down this issue. First, verify that the computer did not go into standby or hibernate. These can interrupt your network connection when the VPN application expects a constant link to the UAS server.
If wireless is in use, perhaps you have moved to (or are in) a location with a low or nonexistent wireless signal, and the VPN might have dropped as a result. Further, it's possible a bad network cable or a problem with the router or Internet connection could have caused this drop.
After you've successfully connected your computer to the VPN, you have access to campus resources such as fileshares. Sometimes you will be prompted to log in when you try to access these resources. You may receive an error message such as "The user name or password is invalid". In the User Name field, enter UA\username. This tells your computer to ask the UA system for your credentials, instead of your local computer.
When clicking on the GlobalProtect icon from the Taskbar (Windows) or Dock (Mac), it will first attempt to open the program. If GlobalProtect is already open, it will appear to do nothing. Instead, look for the globe icon in the lower right corner (Windows) or the top menu (Mac). Clicking this icon will open the GlobalProtect menu with the Connect (or Disconnect) button.
Non-Virtual Computers
If you have an older computer that is not keeping pace with your everyday tasks, you can ask your department to purchase a new computer. The University of Alaska System has contracts with Apple and Dell that provide deals on our recommended hardware. Once your computer has arrived, you will need to fill out a Build Form requesting an employee virtual or employee non-virtual build for your new computer. With that completed, the Helpdesk will reach out to you to schedule a time when we can place the standard UAS software (or build) onto the computer, as well as any specific software you need.
Windows and Mac computers are both supported by UAS. ITS will make every effort to place the employee build on departmentally purchased Windows computers, but cannot guarantee that it will work with every device. We do not currently have a Mac build, but will provide assistance with management and maintenance.
The University of Alaska has contracts with Dell and Apple which allow us to purchase computers at a discounted price with enterprise-level support. UAS ITS cannot guarantee support for other computer brands or those purchased from other vendors. Please visit the Office of Information Technology's Current Hardware Recommendations webpage for Dell and Apple purchasing links.
IT provides software support for Mac computers. While we do not have a Mac build, we can provide certain UA-licensed software. For a list of software available please see the software catalog.
The primary user of a computer is given full administrator rights on the machine. This means you can install any programs you have legally acquired.
IT can install programs that we control the license for, managed through the Software Center. We can work with you to ensure that additional software is available to suit your needs.
When your computer is being built by our technicians, it will be assigned to an individual. This person, the primary user, will be granted full administrative rights to the machine. If there is no primary user for the machine, an administrator should be requested in the build request form.
If you have been issued a computer by your department but it hasn't been rebuilt, please contact the Helpdesk. We can remotely grant you administrator rights to your primary workstation.
Phones
From your on-campus phone, press the Messages button, or dial 5555. Follow the prompt, and enter your PIN, followed by the # key.
You can also check your voicemail by:
- Dial 5555 from a campus phone
- From off-campus, dial 907-796-5555.
- Press *
- Enter your 10-digit number followed by # (ex 907-796-6400#)
- Then enter your PIN followed by # (123456#)
You'll also receive an email notification when you get the email. This will include both an audio file and a link to the Webmail Inbox. Just log in using your UA credentials. We recommend using Firefox, as it supports all functions. If you are accessing the Webmail Inbox off campus, the VPN is required.
The Unity Voicemail system can be accessed via the web utilizing your UA credentials, so resetting the PIN is straightforward.
- Visit the Unity Assistant
- Sign in with your credentials
- Click on the Password menu
- Select Change PIN
- Enter a new PIN
- Save your changes
- You're done! Sign in to voicemail with your new passcode.
For those who utilize a shared account (generally shared accounts like Helpdesk, Financial Aid, or others) please contact the Helpdesk for assistance.
Alternate Greetings on Unity Voicemail
Call into Voicemail and follow these steps:
- Press 4 for Setup Options
- Press 1 for Greetings
- Unity will share your currently set greeting
- Press 1 to re-record a new standard greeting, OR
- Press 2 to enable Alternate Greeting
- This ENABLES your alternate greeting and gives you the option to configure it
- You will be prompted to set an end date
- Press 0 for Later Today
- Press 1 for Tomorrow
- Press 2 for two days for now
- ... and so on ...
- Press 9 to set the Month and Day
- Press 2 for no end date
- It will then play your current alternate greeting
- Press 1 to re-record your alternate greeting
- Press 2 to turn off your alternate greeting
To transfer to a voicemail account, press the transfer button, dial asterisk+extension ('*6400' for the Helpdesk), and immediately press transfer again (if you wait, you will begin to hear the voicemail for the dialed extension).
Why yes there is! Take a look at our web worksheet for the functions available on your phone!
Currently, the system default is to provide a quiet beep over the conversation through the handset. If you would like the second line to ring audibly on your phone set, it can be configured to do other things like ring once, ring, or flash. Use the Call Manager tool to configure your phone behaviors. Contact the Helpdesk if you need any clarification or assistance.
Provided phones are within the same call pickup group when you hear a phone in your area ringing, simply pick up your handset, press the More button, and then choose PickUp. Phones can be assigned pickup groups through your office Telephone Manager. (And, if needed, new call pickup groups can be created by contacting the Helpdesk.)
In the case that is too cumbersome, if you have a free line (button along the side of the phone display), it can be programmed to speed dial the PickUp functionality.
With the way the phone system works, when the call is redirected it is, in actuality, your line calling out. So, it happens to be that the caller ID is correct, albeit misleading.
Note: The Cisco phones on campus can be forwarded to an external (non-campus) line, however, the behavior is essentially the campus line placing a call on the caller's behalf so while you can tell that the call is coming from your campus phone, you will not be able to tell who is going to be on the other end of the line.
First and foremost: call the line! Depending on what happens with your call, you can then know how it's currently acting, and subsequently make requests to ensure that it performs as desired. These changes can be made by your telephone manager. You'll likely want to change which voicemail account is affiliated with the line. Additionally, you can choose to forward the phone using the CFwdALL soft button on the phone.
In most cases, your department Cost Center Clerk is the point person for adjusting phone settings through the Telephone Manager. If you cannot determine the right person in your department to talk to, please contact the Helpdesk to find out which staff are affiliated with a particular phone line.
Email notifications from Cisco can be managed as any other email. If they have been deleted, they can be found in the Trash (Google Mail) or Deleted Items (Outlook) folder. Email notifications can be moved from these folders into different storage locations.
Voicemail in the Cisco Web Inbox is automatically deleted after two weeks, and cannot be retrieved.
The Unity voicemail system can change the speed of playback.
While listening to a message, use the following commands to change the speed of playback:
- 4 to slow down playback
- 6 to speed up playback
The red voicemail indicator light on your phone is connected to your voicemail inbox. This can be accessed online in the Cisco Web Inbox. You can also call in by pressing the Messages button on your University phone or dialing 5555. These two inboxes are tied, changes to one will affect the other. Once all voicemails have been listened to the light will clear. Voicemails will automatically be deleted after 14 days but will remain in your email.
Listening to the voicemail through the email notification will not affect the red light.
You can forward your work phone number to any outside line through the Self Care Portal, as long as you have internet access.
- Log in to the Self-Care Portal
- On the left menu, select Call Forwarding
- For your phone line (7966XXX), check the box for Forwarding all calls to...
- Enter your full cell line in the format: 81907xxxXXXX
- The number 8 is necessary to dial out of campus (ex: 8 1 907 777 7777)
- Click the Save button at the bottom
You can turn off call forwarding by unchecking the box from step 3.
You can also forward your calls using the softkey on your phone if you're still on campus.
- Hit the CFwdALL key on the Cisco phone
- Enter your full cell line in the format: 81907xxxXXXX
- The number 8 dials out of campus, then the standard 1-907-your phone here
- Your phone will now state that it has been forwarded to 81907xxxXXXX
You can turn off call forwarding by hitting the CFwdAll button again.
There are currently five ways you can conduct an audio conference call without revealing a personal phone number.
- Dial *67 before dialing a phone number to conceal your phone number.
- On many smartphones, you can use #31# instead.
- Schedule Zoom meetings by phone as audio options are enabled.
- Use Conference Now, based on your campus phone number.
- Use Two Rivers Conferencing through OIT.
Portfolio
- Sign into UAS Online and click the View Portfolio link on the front page
- Go to any UAS Online course and click the Portfolio link on the navigation bar
- Click on the Portfolio: View link from a class list. This link will only appear once content has been added to a portfolio for that course
Choose a page in your portfolio to have the blog, then go to Manage Page and Content Setting, and finally check the box to Display a weblog.
Go to the page, and click the Manage Page link in the upper right. In Content Settings: Current Items, click Browse. You will then see a list of all of the items that have ever been added to any of your portfolio pages. Find the item that was removed and click the Add button.
To create a thumbnail when uploading your images, in Options for Images, choose Version to Display = Small and Click-to-View = Enabled. When the attachment has been added, preview your posting to see how it will look. The initial image will be small, and when someone clicks on it, a new window will open with the original size of the image.
A forum is a place on an ePortfolio page where you and others can engage in discussions.
To add a forum to any portfolio page, simply go to Manage Page, then Content Settings and Forum Settings, and check the box to Display a Forum on this page.
As explained in the Forum Settings, "People with General Access can view content and Reviewers can post."
By default, for course portfolios, all participants in the class are reviewers. For non-course portfolios, no one is a reviewer.
To add a reviewer go to Manage Page, then Access Settings, and put the usernames of the people you want to review in the Reviewers text box.
Uploaded items added to a page can be shared between pages. Pages in the portfolio system can be copied within the system.
From the UAS Online main page, click the Browse Portfolios link. You can check out what's new, and what's popular, or search for something interesting. As a participant in a course, you will also be able to view and comment on the portfolios of your fellow students from the class list.
By default, portfolio pages are viewable by others but the person would need to know how to get to it. In the "Manage Page" option, you can restrict the access settings.
Within your portfolio, choose Manage Page and click the Publish button. It's a good idea to give your page a good title and description, otherwise, it will be difficult to search for.
Go to PUB (Personal URL Builder) at uas.alaska.edu/pub to create an easy address for any of your sites.
By default all portfolio pages are viewable by anyone, so double-check the following settings: Go to Manage Page, Access Settings, and set the General Access to unrestricted. This will ensure that anyone you invite will be able to view the page.
Portfolios are accessible by anyone with access, so they will be able to view them. Send them a method to access it, such as a custom link or search instructions.
Printing
To Printer Server (active username and password required).
Windows 10
- From the Start menu or the Windows Search field, type: "\\jun-print01" (if on the Juneau campus) and press Enter
- If on the Sitka campus, use "\\sit-print02"
- If on the Ketchikan campus, use "\\ktn-print"
- If prompted, enter your login information, putting "UA\" before your username.
- If you are on a computer built by ITS, it will automatically use the credentials used to log into the computer.
- If you are on a personal computer and aren't prompted for login info, check your security settings. Some internet security software blocks this type of connection.
- Press Enter
- A window will appear showing all printers available on campus. Double-click on a printer to add it to your computer.
- When adding is complete, you will see the printer queue monitor.
To access printers on campus, excluding the Library's Ink Smart system, you must have access to the UAS network and authenticate to the Printer Server (active username and password required).
Print Server
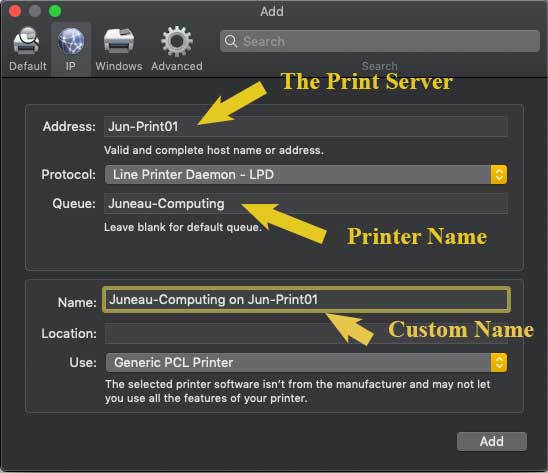
- Open the Apple menu

- Access System Preferences
- Select Printers & Scanners
- Click on the plus sign [+] to add a printer
- Click on the IP button
- In the Address field, enter "jun-print01"(if on the Juneau campus)
- If on the Sitka campus, use "sit-print02"
- If on the Ketchikan campus, use "ktn-print"
- In the Protocol field, select an appropriate setting
- In the Queue field, enter the Name of the printer
- If desired, change the Name field to be an easy name for the printer
- Click Add
- If prompted, enter your login information, putting "UA\" before your username
- If not prompted for login info, check your security settings. Some internet security software blocks this type of connection.
- When adding is complete, you will see the printer queue monitor.
IP Printing
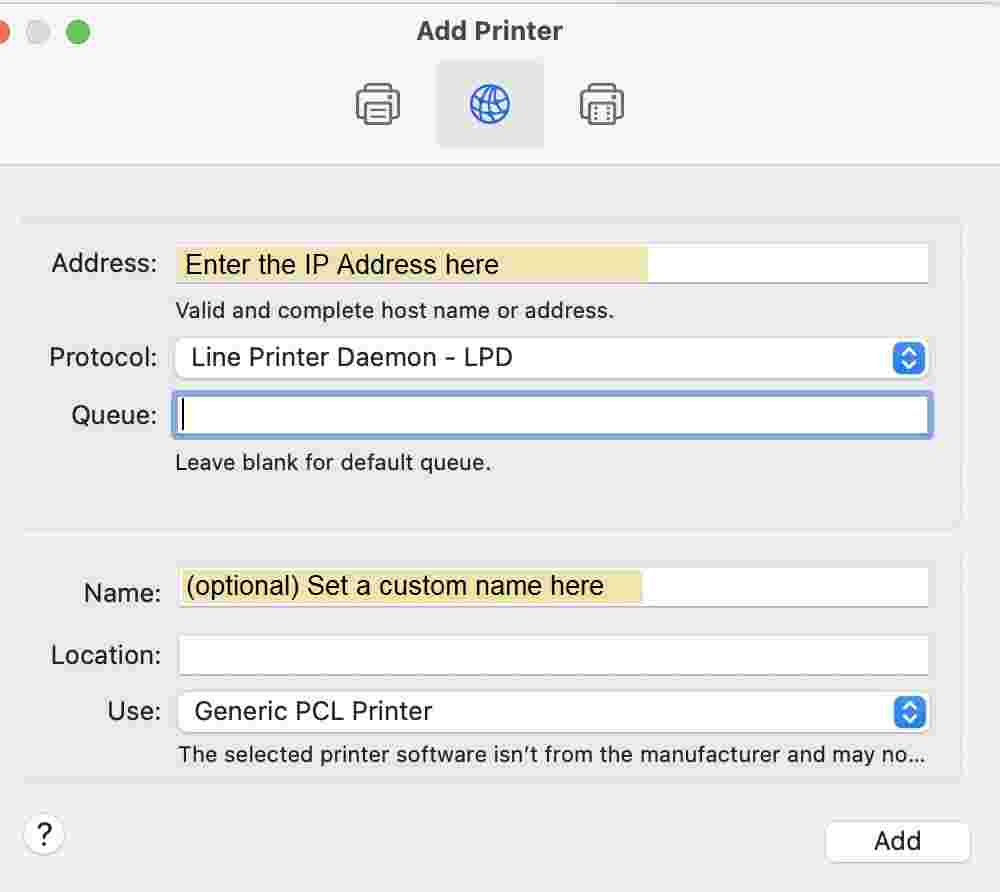
- Open the Apple menu
- Access System Preferences
- Select Printers & Scanners
- Click on the plus sign [+] to add a printer
- Click on the IP button
- In the Address field, enter the IP address of the printer to be used
- In most cases, the IP address will be on a printout attached to the printer. If not available, ask the Department
- In the Protocol field, select an appropriate setting.
- If desired, change the Name field to be an easy name for the printer
- Click Add
- If prompted, enter your login information, putting "UA\" before your username.
- If you aren't prompted for login info, check your security settings. Some internet security software blocks this type of connection.
- When adding is complete, you will see the printer queue monitor.
If you encounter the error "Unable to Connect. Unable to verify the printer on your network", set the Protocol to "Line Printer Daemon (LPD)" instead of the default "Internet Printing Protocol (IPP)." This is a known issue with specific printer manufacturers.
To use the ink SmartStation printer kiosks inside and in front of the Egan Library, you must first access or create a UAS inkCloud account. Please note that these instructions apply to both Windows and macOS computers.
- Log in to the UAS inkCloud portal
- Students: access your account using your UA username/password
- Guest users: create a guest account
- Access your account online to add funds with a credit/debit card or add at a SmartStation in the library or lobby.
UAS users can enter the promo code "alaska5" for a $5 credit. Guests can ask for an ink Guest Card (includes a $2.50 promo credit) at the Circulation Desk. Users without access to an accepted payment method can purchase preloaded ink value cards at the Library Circulation desk in $5 for $10 amounts.
To print to the SmartStation kiosks:
- Log in to the UAS inkCloud portal
- Select File -> Print in the upper right corner
- Download the appropriate driver for your computer's operating system.
- Run the downloaded installer
- You can now select Ink Smart Kiosk Print Driver from your list of printers
For assistance:
- Egan Library staff can provide hands-on assistance using the ink SmartStations, just ask.
- Users encountering any printing problems, e.g. jams, misprints, or formatting issues can notify ink support through email at support@ink.me or by phone at 1-800-INK-6053. Refer to the UAS Egan Library or UAS Spike's Cafe SmartStation to receive a corresponding credit.
- Be sure to check out the ink Knowledge Base and Support
Virtual Computers
A virtual machine is a customizable computer designed to be accessed from a variety of locations. It works similarly to non-virtual computers but is located on UAS servers. Employees can access their virtual machine on any computer with a licensed VMware Horizon Client installation and an internet connection (campus or VPN).
Virtual machines and non-virtual machines differ in several ways:
- virtual machines are independent of hardware
- VMware can be accessed from any computer that follows our license agreements
- offer greater flexibility than physical machines
By shutting the VM down and changing its settings, ITS also can:
- add or reduce the server's memory
- add or remove a processor
- add a virtual disk
- increase an existing disk size
There is also a snapshot feature that lets you save the state of the server in case you need to restore it later on.
Virtual machines and VMware have many benefits:
- Virtual Machines are independent of user hardware. They are accessed through VMware, which can be installed on any computer that follows our license agreements (Windows or macOS).
- Consistent work environment across multiple devices on one profile.
- VMware is fully compatible with older machines that may independently have issues with newer software.
- ITS can rapidly deploy a common, supported desktop environment across the network.
- Updates can be managed centrally, ensuring that all virtual computers are consistently up to date.
- Central management of each standalone workstation across the entire virtual environment.
- Users connecting to a virtual desktop can have full access to all features of that VM without impacting the other virtual desktops or the host server.
Virtual machines are not for everyone. If your job requires you to travel or you are frequently away from a stable internet connection, virtual machines are not well suited for you.
- An internet connection is required. Loss of the internet results in disconnection from your virtual machine. This results in no loss of data.
- If your job requires you to travel or you are frequently away from a stable internet connection, virtual machines are not well suited for you.
- Audio output via HDMI is currently unavailable. This is primarily a concern for folks making frequent presentations or lectures.
- Hardware settings (like batteries) can't be changed from the virtual environment. This limits your external customization (but you still have control outside of the virtual space).
- Virtual machines do not recognize internal disk drives. You will need to use an external disk drive.
- External monitors may require additional configuration.
Stratodesk is an operating system, like Windows 10/11 or macOS. At UAS, this OS is set up to grant quick access to virtual machines using the VMware Horizon Client. Student computers on campus, as well as designated employee machines, run on Stratodesk.
VMware Horizon Client: This is a downloadable client used to access your virtual computer, available at mydesktop.uas.alaska.edu. It can be installed as an app on Windows and macOS.
Yes, we can create a virtual machine for you. It will be a standard Windows 10 Virtual Machine; we do not currently have a macOS virtual environment. Any VM we create will be accessible from any university-purchased computer with VMware installed, Macs included.
Yes! VMware software can be run from a wide variety of devices. UAS is licensed to access our virtual machines from any UAS-owned or leased Microsoft or Apple computer.
It is recommended to not only disconnect from the VM but also log out when you don't expect to be using it for an extended period.
- In Stratodesk, these options are located on the VMware bar on the Connection menu, where you can either Disconnect or Disconnect and Log off.
- In VMware Horizon Client for Windows, these options are available in the VMware bar at the top of the screen on the Options menu.
What's the difference?
- Disconnect: stop viewing your VM. It will remain running on the server. You can return to your VM, in the same state you left it.
- Disconnect and Log off: stop viewing your VM. All programs will close and you will be logged out. When you next access your VM, you'll start fresh.
If you encounter any issues while accessing your VM, call the UAS IT Helpdesk at 907-796-6400 for immediate assistance.
Employee Virtual Machines save your changes, unlike the student Virtual Builds. It is still recommended to save to a department fileshare when using documents you wish to share.
Zoom
Any active UA account can claim a Zoom account:
- Go to alaska.zoom.us
- Click the Sign-in button to configure your account
- Sign in using your UA credentials
- Follow any prompts to set up your account
Once claimed, you can always get to your account configuration and access meetings at alaska.zoom.us.
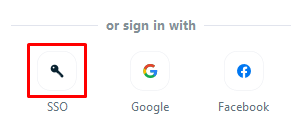
You can log into your account either directly at alaska.zoom.us or by downloading the Zoom app. When logging into the app, make sure to select the SSO option. From there, enter alaska .zoom.us.
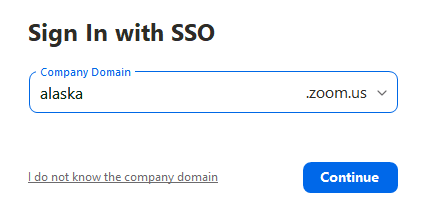
In either case, the UA Zoom sign-in page will open in your preferred browser. Log in with your UA credentials, then follow the MFA prompt.
Yes! Once you've claimed your Zoom account, you can reserve Live Training from Zoom at zoom.us/livetraining. Alternatively, you can watch pre-recorded sessions at any time at the Zoom Help Center.
You can also check out Zoom's Help Center at support.zoom.us. Here you can find tutorials, status updates, and tips for much of Zoom's functionality.
If you already have a Zoom account associated with your UA email, you should still claim your account. Once you have signed in, you will be asked to migrate your account to the UA domain.
Please note that if you have any paid features, these will not be migrated to the UA domain. If you have any questions, please contact the VCS office.
The Zoom app is the preferred option for hosting and joining Zoom meetings. The app is more stable and enables additional features, such as Virtual Backgrounds. Web access through your browser is simple and quick but comes with some limits to functionality.
You can find installers for all supported devices on the Zoom Installers page.
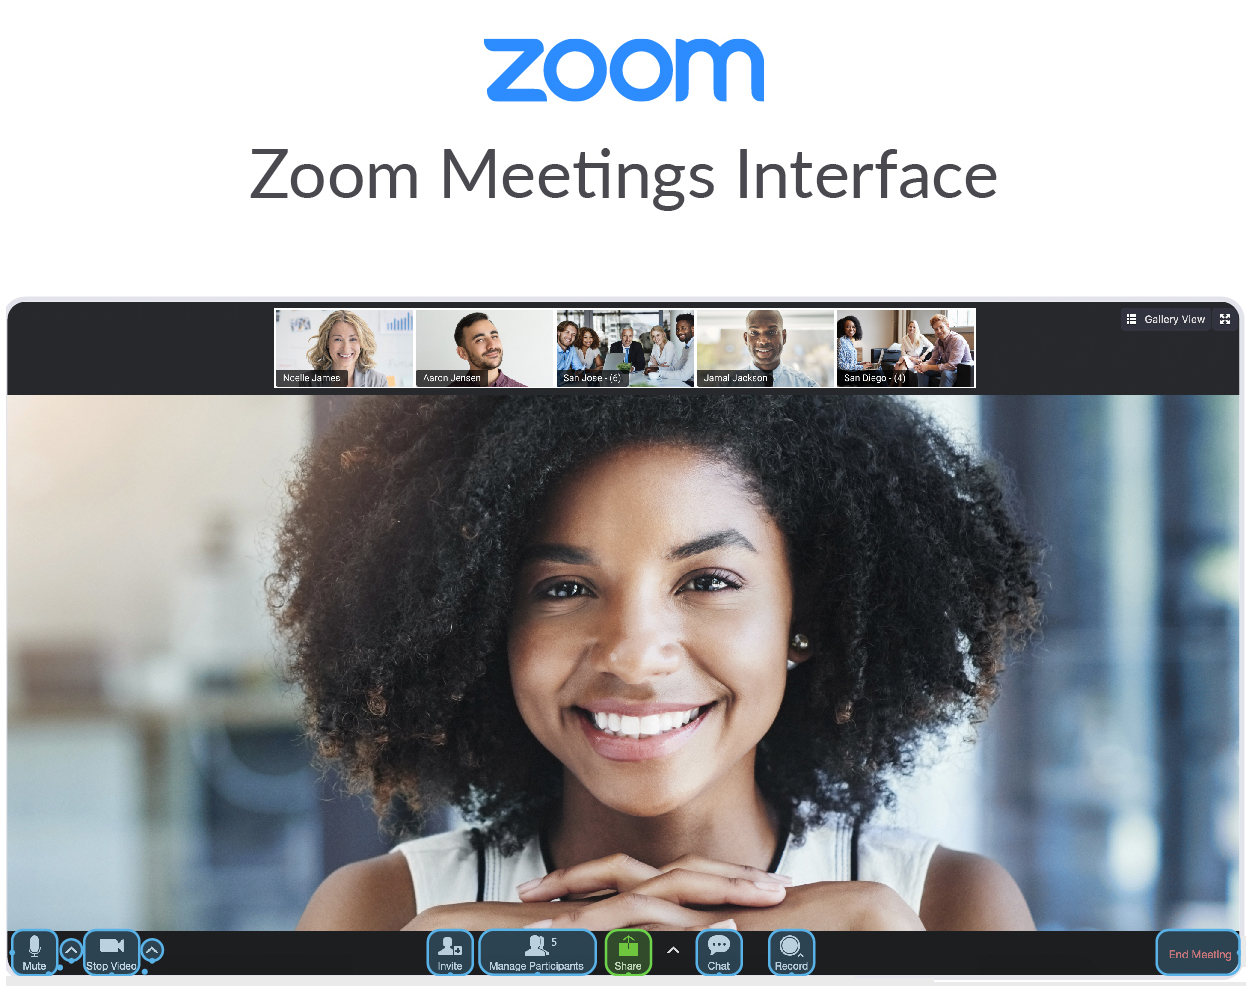
Once you are in a meeting, most of the controls are at the bottom of the window. Here's a quick reference guide for what they all do:
Modified from an image provided by OIT: https://www.alaska.edu/files/oit/ZoomMeetings-Interface-Web.jpg
Buttons (from left to right)
| Button | Function |
|---|---|
| Mute/Unmute & Menu: Mute or unmute your microphone. Click the arrow to adjust or test your audio settings | |
| Start/Stop Video & Menu: Start or stop your camera's video. Click the arrow to adjust video settings and virtual background. | |
| Invite: Send invitations by email, organization (Contacts), or room system. | |
| Manage Participants: The host can manage other participants' audio, camera, sharing privileges, and status. | |
| Share & Settings: Share your desktop, programs, or other content. Click the arrow to adjust your sharing settings. | |
| Chat: Chat in a meeting with the room or with individuals. | |
| Record: Record the meeting either to your computer or to Zoom's cloud storage. Please note that cloud recordings are maintained for up to two years. | |
| End Meeting: Exit the meeting. The host can also end the meeting for all participants. |
Some other features you may see
| Button | Function |
|---|---|
| Polls: Send questions to your participants and view the results. | |
| Closed Captions: Live subtitles written by a participant or 3rd party service. Click the arrow for options and settings. | |
| Breakout Rooms: Split the participants into independent small groups. You can also manage content and membership. |
You can grant other accounts the ability to schedule meetings for you ahead of time. First, make sure both you and the scheduler have claimed a Zoom account at alaska.zoom.us.
- Sign in at alaska.zoom.us
- Access Settings from the left navigation menu
- On the Meeting tab, go to Schedule Privilege
- Click the + button next to Assign scheduling privilege to
- Enter the email address of your scheduler
- Click the Assign button
From this point on, your scheduler can create meetings on your behalf using the Schedule tool.
To schedule a meeting on behalf of someone else, first sign into your Zoom account at alaska.zoom.us.
- Click Schedule a Meeting in the upper right
- Fill in meeting descriptors (topic, duration, date, etc.)
- Select the drop-down menu in the Schedule for the section
- Choose the email address you are scheduling the meeting for
- Click Save
- Copy the invitation and send it to attendees
As the meeting Host, Zoom provides two methods to record a meeting: Local or Cloud recording. If you don't see either of these options when hosting a meeting, check your settings at alaska.zoom.us.
To start the recording:
- Open up the Zoom meeting.
- From the bottom menu options, click the Recording button.
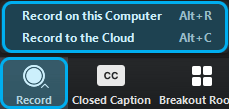
- If prompted, select where you'd like to record: Local or Cloud.
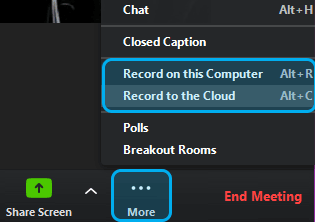
When you start a recording, you have the option of recording either:
- Record to the Cloud: This saves the recording to your Zoom account. Please note that cloud recordings are maintained for up to two years. You can log into alaska.zoom.us to see how long the recording will be available and to download it to a permanent location.
- Record to this Computer: this saves the recording to a local directory. You will have 3 files: Mp4 audio/video, M4a audio, and M3u organizer.
To access a cloud recording:
- Log in at alaska.zoom.us
- From the left menu, select Recordings
- From the top menu, click Cloud Recordings if not already selected
- Search the appropriate time frame for your meeting (it defaults to 1 month)
- Click the Topic link for your meeting
- You can either:
- Play the meeting in-browser
- Download the files
- Copy a shareable link
- Please note that recordings in cloud storage are only maintained for two years. Recordings can be saved locally or downloaded from cloud storage during that time frame.
To access a local recording:
- Open the Zoom app
- Click the Meetings button at the bottom
- Click the Recorded button at the top
- Locate your meeting from the list
- Using the buttons on the right you can:
- Open your meeting location
- Play Video (and audio)
- Play Audio only (no video)
- Delete (this is permanent!)
To change where your local recordings are saved:
- Open the Zoom app (this can't be done from the web)
- Click the Gear icon in the upper-right to open your Settings menu
- From the left menu, select Recording
- The location field shows where you are currently saving your local recordings
- Click the Open button to access the file directly
- Click the Change button to browse for a new folder
When your instructor has recorded a meeting through the Blackboard tool, you can access it from the course menu.
To access a cloud recording:
- Open Zoom Webmeeting on the left navigation menu on your course homesite
- Click the Cloud Recordings tab
- Click on the recording of the meeting you wish to view. By default, meetings are sorted by date.
- Click the Play button to view the recording in-browser
Both the Host and Scheduler will receive an email notification when the recording has been processed. While both can share the recording, it will only show up the listed recordings for the Host.
A local recording can always be placed in a location easily accessible by multiple people, such as a fileshare.
Zoom allows you to set up a static image that displays instead of an inactive camera. To set this up:
- Log in at alaska.zoom.us
- Access your Profile
- Click the Change link under the blank profile icon to the left of Your Name
- Click Upload in the lower left and select the image from your computer, noting the limited size of 2MB
- Click Save in the lower right corner
Starting in your next meeting, your profile image will appear whenever your camera is inactive.
Zoom provides a wide variety of tools to allow you to customize how you want to make your meetings secure. These settings can be found in one of two places, during the initial scheduling of the meeting, and in the Settings tab at alaska.zoom.us. We have listed these settings and what they do below to best help you find what kind of security you need for your meeting:
- Encryption - All Zoom traffic is encrypted. For more information, see The Facts Around Zoom and Encryption for Meetings/Webinars.
- Waiting Rooms - This feature ensures that all participants who attempt to join the room must be manually granted access. No one gets in without a Host's approval.
- Join before Host - If this feature is OFF, then no one can access the room until the Host is ready.
- Lock the Meeting - Once all participants have joined the meeting, the Host can lock the room to prevent anyone else from joining.
- Recording control - Hosts can always record meetings, but can control what participants can do with those recordings, such as view, record, and even download.
- Only Authenticated Users - To prevent random attendees, select the "Only authenticated users can join meetings" option to limit unexpected visitors.
- Meeting IDs - Each scheduled meeting has a unique ID for each meeting. This expires after 30 days to limit access afterward. Instant meetings can use a unique ID or your Personal Meeting ID. Please note that once your PMI is given out, that meeting can always be accessed.
- Microphone and Camera Control - The Host can mute microphones and disable cameras for participants, either universally or selectively.
- Password Required - Limit access to any meeting behind a password. Invited participants will automatically receive the password.
- Screen Sharing & Whiteboard - Limit screen sharing to only the Host, or open it to all participants.
Zoom has many recommendations for How to Keep Uninvited Guests Out of Your Zoom Event.
In Zoom, you will need to follow the link provided by the host or instructor. Then, you will be prompted to download the Zoom app or to run the meeting in the browser. This happens every time you join a meeting.
If this is your first time joining a Zoom meeting, you may need to manually choose to access it via the Zoom app.
Zoom requires a stable internet connection to function. That connection needs to be a minimum of 600kbps up/down. They recommend a broadband connection, wired or wireless (3G or 4G/LTE). You can see more about the official recommendation on the Zoom system requirements page.
When accessing any Zoom meeting, you'll be prompted to select whether to use Computer Audio or Phone Call. If you didn't select Join with Computer Audio, Zoom will not be able to use your microphone. If you close this window, you can get back to it by clicking the Join Audio button in the lower left corner.
If you need to make sure things are working, or if you encounter trouble being heard after connecting, click the arrow next to the Mute button and select Test Speaker and Microphone. The wizard will take you through selecting and testing your speakers and microphone.
If you're accessing Zoom in a browser, make sure to Allow microphone access when prompted. If you don't, you'll need to go through your browser's settings to allow microphone access.
Please note: if your computer doesn't recognize any microphone input at all, or gives you the error "Failed to detect your microphone, check your OS settings. In Windows 10, this is located in Settings > Privacy > App permissions: Microphone. Make sure "Allow apps to access your microphone" is set to ON.
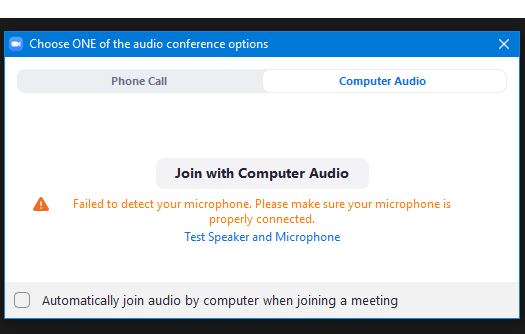
To set up your camera in Zoom from within a meeting, click the up arrow by the Camera icon, and select Video Settings (you can also get to this menu from your App profile). In the Camera dropdown menu, select your preferred camera. A preview window will display the camera output above. Simply click the Camera icon in the meeting to connect this camera to the meeting.
If the camera isn't recognized, make sure any external cables are plugged in, or check your OS settings. In Windows 10, this is located in Settings > Privacy > App permissions: Camera. Make sure "Allow apps to access your camera" is set to ON.
Zoom cannot present content inside the meeting. Instead, participants can click the Share Screen button to select either a full display or a specific application to share. This will then be visible to all other participants. The Host can manage this ability.
If you're having trouble connecting to your webmeeting, check if your host or instructor allows you to call in by phone. Most Zoom rooms are automatically configured with a call-in number, which you can access by clicking the arrow next to the microphone icon, selecting "Switch to Phone Audio...", and following the prompts.
Alternatively, your instructor or meeting host can provide a dial-in number, meeting ID, and (optionally) meeting passcode for phone-only access.
From the link on your Blackboard Course site, you will be presented with the Zoom controls. Instructors will have scheduled meetings that will be visible in Upcoming Meetings. Click the Join button to the right of the meeting to enter. You can then choose either to Open in the Zoom app or start from your browser. You will then automatically be placed in the meeting, and be prompted for audio setup.
Hosts (and Instructors) have several options to secure Zoom sessions to prevent access by non-students. If you join the room and see a message that says "Please wait, the meeting host will let you in soon" or "Please wait for the host to start this meeting", then your session is configured to make it harder for unnecessary individuals to access your course. Just wait for the host to get ready before they start the meeting.
Zoom allows you to set up a static image that displays instead of an inactive camera. To set this up:
- Log in at alaska.zoom.us
- Access your Profile
- Click the Change link under the blank profile icon to the left of Your Name
- Click Upload in the lower left and select the image from your computer, noting the limited size of 2MB
- Click Save in the lower right corner
Starting in your next meeting, your profile image will appear whenever your camera is inactive.
Zoom limits each individual to only be able to host one meeting at a time. However, you can use the app to join additional meetings hosted by other individuals. To turn off (or back on) the ability to join simultaneous meetings:
- Log in at alaska.zoom.us
- Access your Settings
- In the In Meeting (Basic) section, locate the Join different meetings simultaneously on the desktop
- Click the button on the right to toggle this function On/Off
Please note:
- To access additional meetings after the first, you will need to use the web interface at alaska.zoom.us
- Your microphone and camera can only be active in one meeting at a time. When you want to be seen and heard, make sure to activate your audio and/or camera in the correct meeting.
All Zoom meetings require a Host. If the host is not present and authenticated, participants will be prompted to claim the session by entering the Host Key. Only the correct Host (or Alternative Hosts) can use their Host Key to claim the meeting.
If you don't know your Host Key, log in at alaska.zoom.us and access your Profile. Your Host Key will be listed at the bottom of the list.