Editing a page with WYSIWYG
To edit a page click the 'Edit' tab.
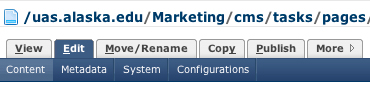
When you click 'Edit' you will see three panels.
- The panel on top is for Metadata
- The main middle panel is the WYSIWYG editor for the page default content
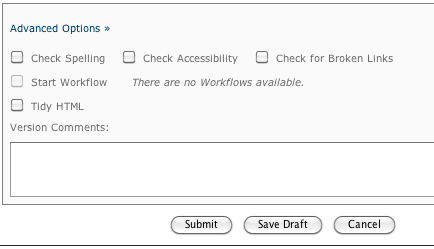
- The small panel at the bottom before the 'Submit' button is for Advanced options (see bottom of this page).
Cascade's WYSIWYG editor
WYSIWYG is an acronym for "What You See Is What You Get." Cascade's word processing functionality is referred to as the WYSIWYG editor because as its name implies, it allows you to see formatting while editing in your content in the word processor (much like Microsoft Word®).
The word processor, which is integrated in the CMS system, has the same functionality and features you are most likely accustomed to using in a standard editor. The functions available in the WYSIWYG are all available at the top of the editing content window (as with most word-processors), and include:

The WYSIWYG editor allows users to visually preview changes as they are made. If a user desires control finer than common functionalities such as bold, italics, tables, and image movement provides, they may opt to see the source XHTML 'behind-the-scenes' and toggle between the visual and source modes. Additionally, CSS classes allow users to select various styles from a drop down menu.
Using the WYSIWYG
When a user clicks Edit on most pages, the default region opens in the WYSIWYG (What You See Is What You Get) Editor.

Selecting Styles in the WYSIWYG
Styles are an easy way to cleanly format text via the WYSIWYG. Default styles such as Heading 1-6, Normal, and Address are often statement by Administrator-selected styles to suit the needs of each site.
To select a style for existing text, simply highlight the text and select the style from one of the dropdown boxes on the left side of the toolbar.
Alternatively, you may place your cursor on the desired line, select your style from one of the dropdown boxes and any new text typed will automatically be formatted with the selected style.

HTML Toggle
Users wishing to edit content in HTML may click on the HTML icon inside the WYSIWYG. To return to the WYSIWYG view without submitting changes, the user may turn off the HTML view by clicking the icon again. This is a valuable feature for technical users who feel more comfortable working in the HTML environment. This feature can be turned on and off at the content type.

Advanced users who wish to tweak the content of a page via the HTML code may simply click the HTML toggle icon to switch back and forth between views. Content may be submitted via either view.
Editing Using the WYSIWYG
Cascade's WYSIWYG provides several features that make editing and creating web content simple.
Inserting and Managing Links More »

To insert a link:
- Select your Page and click Edit in the action bar.
- Highlight the word or words you wish to hyperlink.
- Click the editor's Link button (shown above).
- A link insertion dialog will appear.
- To link to a Cascade-managed asset, use the available asset chooser on the Internal tab and select the asset to which you would like to link.
- To link to an external resource, click on the External tab and type in the full URL for the resource to which you wish to link (i.e. http://www.hannonhill.com).
- Choose a target window for the link using the Target dropdown.
- Optionally specify a Title for the link.
- For advanced users, insert a Class and/or Anchor for the selected text.
- Click Submit to insert the hyperlink.
- Check the Text being linked and amend it if necessary.
- Save the hyperlink in the page by selecting Submit on the page
To edit a link:
- Highlight or move the cursor inside of the linked content.
- Click the editor's Link button.
- Change the properties of the hyperlink and click Submit.
- Click Submit on the Page to save changes to the hyperlink.
To remove a link:
- Highlight or move the cursor inside of the linked content.
- Click the Unlink button (next to the Link button)
Inserting and Managing Images More »
You can insert an image that is stored in Cascade or one that is on the computer's hard drive. If the image file is on the computer's hard drive, it can be uploaded one of two ways. The user can either use the New Menu to create a new File asset or the file can be uploaded via the upload pane of the File chooser that is available in the Insert Image dialog.

To insert an image:
- Click the Insert Image button or right-click and select "Insert/Edit image"
- For internal images, use the File chooser to locate the image within Cascade. (Optionally use the upload pane on the File chooser to upload a new image)
- Preview the image and set its properties.
- Click Submit
- Click Submit on the Page to save all changes made to the Page.
To remove an image:
- Select the image
- Either press the Delete/Backspace key or right-click and select Cut
To choose a new image or change the image's properties:
- Select the image
- Either click the Image button or right-click and select "Insert/Edit image"
- Modify the chosen image and its properties
- Click Submit to update
The following properties can be edited:
- Alternate Text - sets the alternate text of the image using "alt" attribute of the <img> tag. Alternate text will appear when rolling over the image with a cursor or when using a browser that does not render images such as a screen reader.
- Width/Height - sets the width and height of the image in pixels using the width/height attributes of the <img> tag. This does not modify the dimension of the source image.
- Alignment - aligns image on the page using the "align" attribute of the <img> tag
- Border Thickness - to adjust the thickness of the image's border
- Horizontal Padding - sets the amount of space between the left and right sides of the content area and the image.
- Vertical Padding - sets the amount of space between the top and bottom sides of the content area and the image
Inserting a table in the WYSIWYG
You can create, edit, copy, and delete tables.
To create a table:
- Place the cursor in the editor so that it is in the desired location for the table.
- Click the Insert Table icon.

- An Insert Table dialog will appear.
- Select the number of Rows and Columns for the table.
- Other options include the table's Alignment, Border thickness, Cell Spacing, Cell Padding, and Column Width.
Tables can also be copied from existing content in external documents.
Paste from external Word Processors
The WYSIWYG supports pasting from external Word Processors such as Microsoft Word (Mac and Windows) and Google Docs. For Microsoft Word, it does its best to clean-up extra tags that exist in the source document. Content cleanup happens automatically when pasting either with the button in the WYSIWYG or with the browser's native Paste command.
The Paste as Text button puts the WYSIWYG into a mode where content is pasted as text only. The WYSIWYG does its best to remove any formatting, style or structure.
The Cut, Copy, Paste buttons appear in all browsers but are incompatible with browsers such as Firefox and Safari. These incompatibilities are the result of browser security restrictions and are not the fault of the WYSIWYG. When a user attempts to use the buttons in an incompatible browser, a message will warn the user and suggest they use the browser's native Cut, Copy, and Paste command.
If you want to be sure to remove all formatting tags (which can interfere with proper display) paste the content into a 'Notepad' application outside of the CMS. Make all that content 'plain text' copy it again and paste into the WYSIWYG.
Advanced Options
You may check the page for spelling errors and broken links if you check those boxes in the "Advanced options box BEFORE you click 'Submit.'